Hazel's Place

Hazel's Place
Picture modified by Pete C (W650 rider)

Saturday, 27 July 2013

I've been slacking so here's an update - part 2: SRX antics

Aah, now, since my last SRX related post, which sounded quite promising, disaster struck.  The black SRX tank, which I had transferred to the running (previously blue) SRX, managed to lose all the petrol overnight. Investigation revealed that the recently applied paint had bubbled in a couple of spots on the underside of the tank.  I investigated further, using glass-paper and a stanley-knife blade. I found holes, lots of holes. Holes from which the petrol had escaped.....

Now I had two SRX tanks in need of repair. I had to make a trip to and through Wolverhampton to deliver them to the man who could work magic on them.  Believe me, unless you have pressing business in Wolverhampton (such as a hospital appointment or tanks that need mending) - avoid it like the plague.  The traffic is a nightmare; the traffic system is a nightmare - I felt fraught, I felt grateful that I live in Telford and only occasionally need to have hospital appointments in Wolverhampton or take tanks there to be repaired.

I delivered the tanks and the man who works magic was sure that the magic was strong enough to fix both tanks. I endured Wolverhampton once more and was grateful for Telford once more.

Some time later I received a text to the effect that one tank might not be salvageable - or at least, not cost effective to bother with. I waited for the next update.....

Hurrah ! Both tanks were salvageable - just about.  I waited patiently....

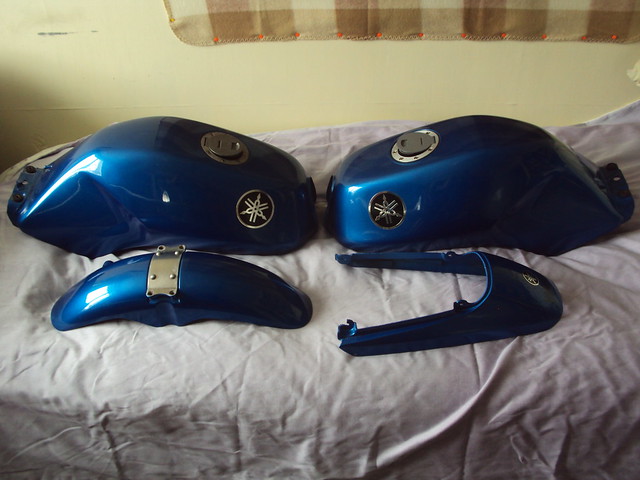
Then, earlier this week I got the text that they were ready. I battled through Wolverhampton again, swearing and muttering and sighing. I survived.  I'd expected to see a painted tank, with matching tailpiece and front mudguard plus another tank in primer. What I got was both tanks painted, plus the tailpiece and front mudguard.  A hole had been cut in the bottom of the dented tank so as to gain access to push the dent out, both tanks had plates welded in to cover the sieve-like areas, both had been lined with tank sealant, then they'd been primed and painted.  Apparently, it took seven hours to weld and undent the first tank ! I think I got a very good deal.


Anyway, they look far too smart for the rest of the bike(s). I also noticed that the MOT ran out on the day I collected the tanks. Also, I was told off for noisy exhausts at the last MOT. I've got no spare dosh at the moment so I've decided to just use the best bits of each bike to get the running one back on the road.  I checked out the project bike and it the original standard Yamaha exhaust system so I thought it would be worth pinching that for the running bike.

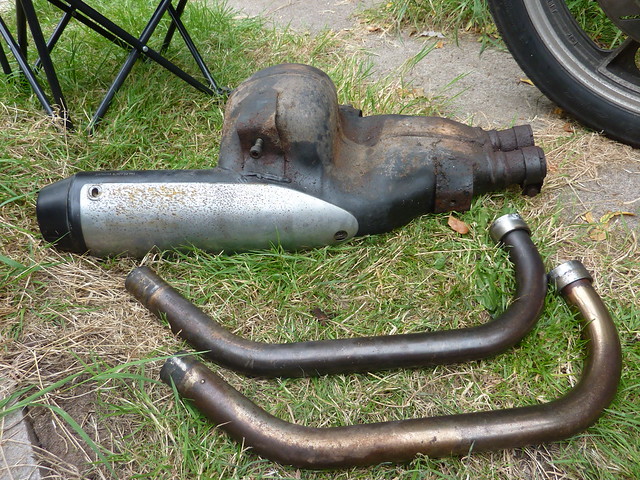
The project bike is pretty rusty looking so I sprayed all the bits I wanted to undo with WD40. Even so, I was pleasantly surprised by how easily most of them came undone.  The tricky part was removing the exhaust system - I couldn't remove the downpipes from the collector box in situ and ended up removing a small crossbar from the front of the frame so I could manoeuvre the system out in one piece. Once that was done, it was easy to wiggle the downpipes out of the collector/silencer.  There's a lot of surface rust which I have attacked with a wire brush and wire wool. I found three small holes under one of the brackets but apart from that it is in very good condition and I think the standard downpipes are stainless.  I've treated the collector/silencer with Krust and will spray it black tomorrow (weather permitting), polish the heat-shield thingy and polish the downpipes. I think it should look pretty good.

To be continued....

I've been slacking so here's an update - part 1: Little Honda

Sad to say but I only have one bike with tax AND mot at the moment - Horatio, the XL185 at last got through his MOT this week.  That was far more complicated than it should have been - the first time I booked him in, he decided that his battery wasn't charged enough to work the indicators so I had to cancel.  Then we noticed that the back tyre was looking a bit perished on the sides so I had to swap it with the back wheel from Herbert, the other XL185.  We checked everything over and all was fine, everything worked.

Off we went in the Special Bus for a fabby weekend at Mallory Park, thanks to me winning the RC caption competition on Facebook. Or rather I was runner up but the winner didn't want the prize of two weekend tickets for the VMCC Festival of 1000 Bikes, so I got it by default.

The MOT was re-booked for Wednesday, I went to work and BH was to take Horatio for his MOT. I got a ranty phone call along the lines of "What's wrong with this f**king bike, the handlebars and forks and front wheel are all out of line, it's f**king f**ked !" Or words to that effect. Frankly, I was baffled.  Last time I'd ridden him, everything was fine - we'd ridden to Leicestershire and back, a round trip of 120-130miles, without any problems.

BH was able to straighten out the forks and front wheel but the clocks, headlight and handlebars still looked wrong.  On examining the bike, it was clear he had been dropped or fallen over as there were scuff-marks on the headlight screen. And as I hadn't dropped him or found him lying down he must have managed to stand up again, put his sidestand down and pretend nothing had happened !  All I can think is that,while we were away at the weekend, kids had kicked a ball into the garden, clambered over the fence (over six foot high) and somehow knocked Horatio over, panicked and picked him up again and run away.

Anyway, I had to take the headlight off, disconnect all the wiring, unbolt the headlight bracket, bash it back into shape with Mr Lumpy and reassemble.  That worked reasonably well. I decided to swap the front wheel with the one from Herbert, so that Horatio had a matched pair.  That worked well too.  I decided to ride to the car wash - it's only just down the road so I decided to ride in shorts and a t-shirt. I hated it, I felt far too paranoid about falling off, or the front wheel falling off, or something else disastrous. As it turned out, the closest thing to disaster was that the car-wash was broken so I'd gone through all that paranoia trauma for nothing ! I washed him at home with a sponge and a mop bucket full of soapy water, then treated all the worst rust patches and touched up the paint so he didn't look too neglected.

He at last passed the MOT without any advisories, although the MOT man (having already commented "You've made it at last then!") kindly tried to tell me that he'd failed miserably.  Hahahahaha ! NOT funny ! But I got a £5 discount so all is forgiven .....


Sunday, 3 March 2013

It's been a while....

Well, I knew I'd neglected the old blog a bit but it's been more than a year ! Someone who shall remain nameless has given me a couple of subtle nudges over on Facebook so I will try to make more of an effort in future - hopefully that will also give me a kick up the arse to get some more worthwhile Stuff sorted out.

Slight progress was made today with the two SRX400 projects, more of that in a bit.

I was up bright and early today to attempt my first run in two weeks, thanks to having been struck down with some Dreaded Lurgy.  As it turned out, it may have been early but I wasn't very bright.  I wasn't sure whether I was meeting my running friends at 9.00 or 9.15 but I walk/jogged down to our meeting point and arrived at 9.06 then did some stretching and jogging on the spot while I waited until 9.15. No-one in sight so I assumed I should have been there at 9.00 and set off down the track to Ironbridge. I won't bore you with the details but about 7km later I arrived at the Ironbridge, feeling reasonably ok.  I stopped for a breather and to decide where to go next but while walking I felt a sudden sharp pain in my hip/lower back and found myself struggling to walk comfortably.  I decided to walk for a bit and text home if things didn't improve.  Things didn't improve and I tried texting but either the phone or the network weren't playing and I resigned myself to limping home.  A bit further up the road, my friends came running past - they'd been delayed and I must have missed them by seconds.  I was quite surprised it had taken over 7km for them to pass me - I must have been doing ok until my injury.  There was nothing they could do so I carried on limping and wincing. I eventually got home, phone still useless, having covered 7.7 miles in a long 2 hours and 20 minutes.  I can now tell you from experience that being warmly dressed for a run does not mean you are adequately dressed for a long walk - I was frozen and it took me ages to warm up enough to venture outside again to play with motorbikes. My fingers wouldn't work properly for more than an hour !

Several mugs of tea later and having searched in vain for my overalls, I eventually got togged up in Better Half's Caterpillar overalls and ventured out into the mess I call a garden.

Some of you will know that I have two Yamaha SRX400s. One was bought as a runner, a tatty but pretty little thing that I think must be one of my favourite bikes ever.  Sadly, while on holiday last year I dropped it on a bollard and made a huge dent in the pretty blue tank.  Tanks are hard to come by and I eventually bought another SRX on ebay just so I could have the tank.  It was a bargain £165 and although rusty, too good to just use for spares.  The long term plan is to tart them both up and keep them both. The short term plan is to get all the black bits from the "spares" bike on to the running bike and use it, while getting the "spares" bike tidied up and running and getting the dented tank fixed.  This will probably take much longer than I'd hoped, due to lack of funds.

Today's plan was just to swap the black bits for the blue bits. Simple, yes ?

Yesterday, I discovered the black (undented) tank had a quantity of water in it. This proved quite a challenge to remove. I couldn't just tip it out - it needed shaking, twisting and lots of hard work to get it to splash out a bit at a time, followed by soaking up the last dregs with an old towel inserted through the filler cap hole.  It is now hanging up to dry out in the conservatory.

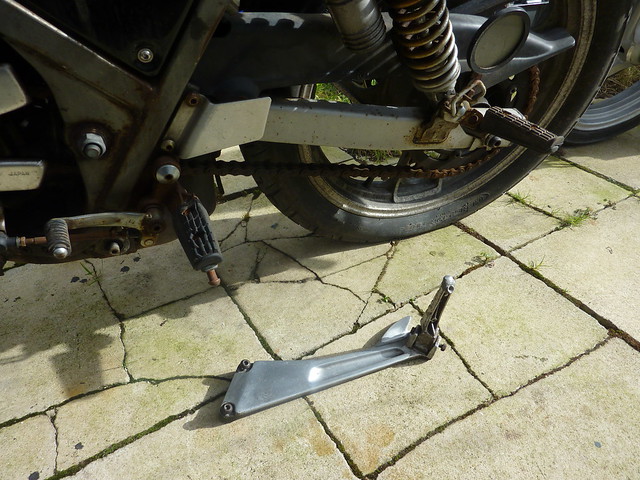
The two bikes are from different years and there are some differences.  They are both twin-shock (later models were monoshock) but we'd already noticed the wheels are different.  Closer inspection showed differences in the way the pillion pegs are mounted.  Blue bike has brackets for the pillion pegs and I'd previously removed these - they're redundant as I don't take pillions.  On the black bike, the pegs are mounted on the swingarm - that must be fun.  You can see the difference in the photo:

On the blue bike the footrest bracket mounts where the small plate can be seen above the rider footpeg in the picture.  I thought the little aluminium plate would look nice on the blue bike, so I quickly removed it from the black bike and went to fit it to the blue bike.  I found that not only were the threads on the frame different but the holes were differently spaced - the mounting holes on the blue bike were so much further apart that I can't even slot the holes on the aluminium plate to make it fit.  That was disappointing as I think they would have neatened things up nicely. I may try to make my own some time in the future.

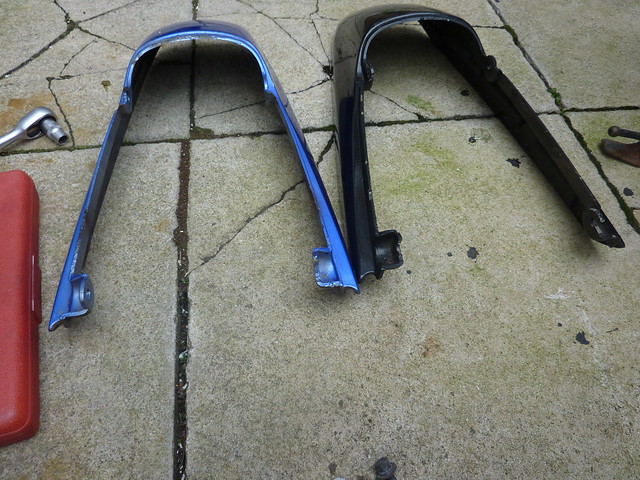
Next job was to switch the tailpieces around.  Now that was nice and easy - no differences there, even the damage to them appears to be consistent !
The damage isn't too bad and the tailpieces were straightforward to fit, I just took the opportunity to fit nice new stainless caphead bolts and washers. My workshop/conservatory may be disorganised chaos but my nuts, bolts and washers are nicely arranged:
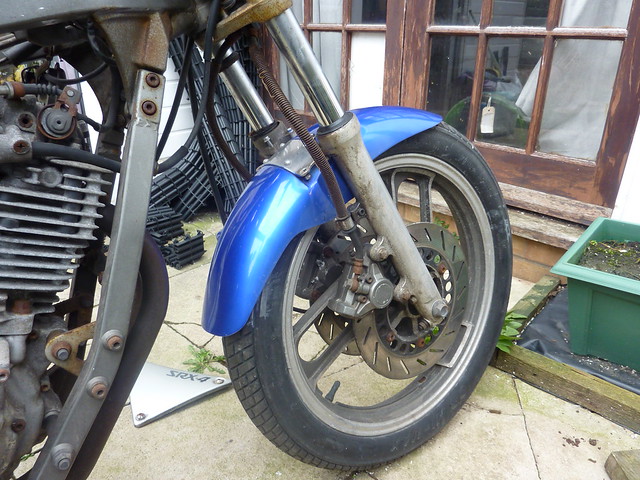
The front mudguards proved puzzling. First I undid the bolts holding the black mudguard to the black bike. It took a lot of wriggling and manoeuvring to extract it from between the forks but it finally came free. Next I removed the blue mudguard from the blue bike - that came free with no effort at all. I compared the two mudguards and they appear identical.  I fitted the black mudguard to the blue bike - no problem at all, no wriggling or twisting, it just went straight in. I fitted new stainless bolts and all was well.  I then tried to fit the blue mudguard to the black bike and just couldn't manage to wiggle it in between the forks. I gave up before I was tempted to use brute force.  Damn thing can just rest there for now....
I managed to switch one of the sidepanels but one of the bolts on the other one had been rounded off and will need drilling out.  The drill battery was on it's last legs so is now recharging.....
This is the progress so far:
Not terribly impressive really, is it?

In between swapping round black and blue bits, I proved to myself how very un-bright I am today.  The black bike came without a CDI unit but I have since bought one from someone in the Thumper Club.  One of my plans for today was to try it out on the blue bike, to check it all works. Having removed the appropriate side panel from the blue bike I went to look for the CDI unit.  All my SRX bits are in a plastic storage box and I was sure it would be there. It wasn't.  I turned the living room upside down looking for it, without any joy. I started to wonder if I'd imagined buying it.  I looked again at the shelf where the plastic storage box had been kept.  Next  to the space where it had been was a small cardboard box.  I opened it and unwrapped the bubble wrap - there was the CDI unit ! Why didn't I look there to start with ? It's one of those days....

Plan for next weekend:
Test CDI unit;
Fit new filler cap to black tank;
Fit petrol tap to black tank;
Fit black tank to the bike that was formerly blue;
Fit CDI unit to black bike;
See if black bike will run (it should do - there was a video of it running, using a borrowed CDI unit, on the ebay listing)

Monday, 2 January 2012

Take a look at this:

Some stunning photography here.  Enjoy !

Kevin Dean Photography

Saturday, 3 December 2011

Cub Mag and Blog

GBC has been very busy and there is a new Cub blog plus a Cub magazine in the pipeline - check out www.thecubmag.com

Also included in the "Blogs" sidebar.

Tuesday, 15 November 2011

Monday, 7 November 2011

Friday, 28 October 2011

Need an excuse to go for a ride?

Check out the Bridge Club:

http://thebridgeclub2011.blogspot.com/

There's also a Facebook page...........

Sunday, 7 August 2011

Batavus HS50 - seat renovation part 1

I posted some pictures of the Batavus project a while ago and it was clear that the seat needed some attention, the cover being held together by lots of conspicuous re-stitching in now-rotting thread and bits of black sticky tape.

I've never restored anything before, just bits and pieces of things so I'm still unsure how far I'll go with this one.  I think I'd like to do a reasonable job over time but I'm not aiming for an over shiny and perfect finished article.  I really prefer things to look their age ('cept me!). What I have decided is that I want to do it at no cost at all.  Now this clearly isn't realistic unless I go out robbing things so I've decided that if need to buy anything for it (which I certainly will need to do) I have to fund it by selling things, mainly on ebay I expect.  Wherever possible, I'll use things I already have.

So far, I've paid £80 for the moped and £26 for some engine spares.  I'm allowing myself the original cost and I already had a balance in my PayPal account from selling some biking gear to pay for the engine spares.  Today, an item I was selling on ebay went for £68 (I'd been expecting about £40 so this was a good result).  I placed an advert on the local Freecycle about a week ago to see if anyone had any vinyl offcuts to cover the seat with.  I didn't get any vinyl but I did get a helpful email pointing me in the direction of Dunelm, so today I splashed out and ordered a sheet of black leatherette/vinyl with which to re-cover the seat.  That's £10 spent, including delivery.  I could have paid £2 extra for next day delivery but, tempting though that was to an impatient sort of person such as I, I opted for the economy 5-7 days delivery in the interests of being frugal.

This afternoon, I started to carefully take the seat apart, in readiness for the arrival of nice, new vinyl.  I haven't seen a seat constructed quite like this before.  There is a metal framework for the base, with seat springs.  Over that is a rubber covering, made from four pieces of rubber stitched together.  The rubber is fairly thick and holds it's shape when not fitted to the metal base but a lot of the stitching is rotten and most of it will need re-stitching.  A thin layer of foam is glued to the top and back of the rubber layer and then the vinyl seat cover is fitted over the top.  This is made from three pieces of vinyl stitched together.  There are three holes drilled in each side of the metal frame and once the vinyl cover is in place, with the edges folded up inside the base, three tiny bolts each side go through the vinyl cover, then the rubber layer, then the metal seat base and then through the vinyl cover again before being secured with a washer and nut.  Some of the original bolt heads sheared off when I tried to unfasten them, then the nuts had to be hacksawed off the inside of the seat - lots of rust!

Once the vinyl cover was removed, I was able to pull the rubber cover away from the frame and then start very gently prising the foam away from the rubber cover.  It was glued in place but I wanted to keep it in one piece so I can use it as a pattern for the new foam (I will probably use an old camping mat for that).  The pictures below show what I am left with.

The metal base will need a lot of work with a wire brush, then some rust treatment and some black paint.

The rubber cover needs restitching.  Because it is quite thick and some of the old thread is stuck in the holes I will probably need to go round it all with a needle making sure all the original holes are clear before I do the actual stitching.   I plan to use clear, plastic thread for this so that it won't rot.

I will then stick foam to the rubber cover.  Because I'll be using camping mat it will probably need more trimming and shaping at the edges than the original foam, which is a lot softer.

When I make the vinyl cover I will probably try and save the middle panel from the original as this has the ribbed pattern and the Batavus logo on the seat hump.  It's had a hard life and there are several splits in it so I'm thinking I'll glue it to a piece of the new vinyl before stitching it all together - this should give it more strength and some degree of waterproofness! Using part of the original should also mean it doesn't end up looking too Brand New - I don't want to have to make the rest of the bike too perfect just so it matches the seat!

The original seat foam.  I didn't do too bad a job of removing it - it will serve it's purpose as a template for the new foam.

The inside of the vinyl cover, showing the numerous repairs it has undergone.

The "Batavus" name on the seat hump and a bit of the ribbed effect I want to keep on the finished seat cover.

Rough looking vinyl seat cover

The rubber seat cover, showing just one of the places where the stitching has completely rotted.

Inside the rubber seat cover.
..and this is the metal base and springs.  It must have been a fairly plush seat for a moped.  Lots of work needed with the wire brush though.

Tuesday, 2 August 2011

More Batavuses / Batavi (?)

Batavus Bilonet 1959 - does anyone else think it looks a little like a BSA Beagle? Does anyone else care what a BSA Beagle looks like?
Batavus Whippet 1963
Thanks to Bodger for posting this piccie via Facebook.

More piccies on this link


Sunday, 31 July 2011

Chinese Norton Skywing Honda Camino Amalgamation

Earlier this year, some brave/foolhardy souls from the Real Classic message board decided that it would be a good idea to take part in a John O'Groats to Lands End moped challenge to raise money for the Help for Heroes charity.  They chose to attempt this on a Chinese Skywing moped, that became a Norton thanks to the addition of some genuine Norton footpegs and some badges. Sadly, the brave little mopeddy died a death after little more than 300 miles and ended up in my Home for Distressed Mopeds.  The original plan was that I should just store it until MadMike collected it and took it for scrap but that seemed like a waste so I ended up with the log book and moped in the hope that some way of fixing it could be found.

We did some research and found that it was some sort of copy of a Honda Camino so I've been keeping my eye out for a bargain Camino ever since.  It had to be very cheap just in case it didn't fit! Last weekend we collected a low mileage complete Honda Camino won for just £56 on ebay - I think the low price was helped by the fact that the auction ended at 8.00. bright and early on a Sunday morning. I was in two minds whether or not to get out of bed to bid but I'm glad I did!

This weekend, while I was tatting around with Bertie, The Boss was playing with the Honda Camino and soon had it running so it was time to try and fit the working bits into the Skywing.  First attempt was to fit the complete engine and back wheel in but the main problem there was that the wiring didn't match up.  The next plan was to just fit the Honda head, barrel and piston to the Skywing - this meant that we still had the newer wheel from the Skywing.  I'm making it sound quite easy but that's because The Boss did most of the work.  I was on engine cleaning duties. After connecting electrics, fuel pipe and cables the Skywing Norton Chamino hybrid was soon running and even got taken for a bit of a run up the road.

The Camino had pedals whereas the Skywing was a kick start.  The "finished" Chamino retains the kickpart but there are no footpegs - apparently it didn't come with them, there is just a sort of plastic footplate but that doesn't really feel as if it is in the right place (you feel a bit of a twat riding it like that). Also the splines on the kickstart look pretty shoddy so I'm not sure how long they'll last.  Longer term, we (as in The Boss) may transfer over the pedals and pedal starting gubbins instead of the kick start.


The donor Camino
 I've noticed that you can get Honda Camino big-bore kits on ebay so, longer term, the donor bike may get fixed up, registered and sold on.  Seems a shame to waste it!

Pete Sykes Mad Moped piccies

Batavus Update

Yesterday, I put the cleaned carb back together and then re-fitted it to Bertie.  The fuel tap had been soaking in petrol so I refitted that as well, filled the petrol tank with a 50:1 ish mix of petrol and two stroke oil, then refitted the petrol tank.  A bit of pedalling later and he was running.  He stays running for longer than he did before but still isn't quite right.  To be fair, the exhaust system is missing so I just cobbled on a knackered Ariel 3 one.  I can't take him for a test ride because the Ariel 3 downpipe stops the front wheel from turning and the tyres (which look as if they are the original ones) almost certainly won't hold any air!  I'm going to be funding his "restoration" entirely from funds raised by selling stuff on ebay so my next step is to raise enough money to buy some nice new tyres and tubes.


It seems to be a good way of shifting rust from an Ariel 3 exhaust!

Friday, 22 July 2011

Batavus Bits

Batavus Caveman - you can even buy hatpins with him on!

Magazine review of the HS50 - this is the model I've got.
Batavus Whippet - build your own.
Are flares practical moped-wear?

The former Laura Anker factory where they made the engines both for Batavus mopeds and for Ariel 3s.

Another view of the Laura Anker factory in Eygelshoven.

Batavus HS50 on the right (they were all red, apparently).  I'd guess the yellow one is a Batavus Go-Go but I'll have to do more research.

Batavus Conforte - build your own.

Wednesday, 20 July 2011

Monday, 18 July 2011

Batavus Reading

Thanks to Kawa for the following links:

Batavus HS50 manual

Batavus Service and Repair Manual

I like this bit:

Sunday, 17 July 2011

Bertie Batavus

I've already mentioned the Batavus moped I bought while at Uttoxeter so here are a couple of pictures of him.

Ariel 3 engine removal

While at Uttoxeter, I acquired a Batavus HS50 moped, having somehow justified the purchase on the basis that the Batavus was running and had the same Laura Anker engine as the Ariel 3s.

Now, Bertie Batavus has missing engine covers and he's having to live out in the rain at the moment so I thought I'd borrow covers from one of the Ariel 3s.  The Ariel 3 engine I bought on ebay came without covers so that was no help.  Next possibility was the snot green Ariel 3 that apparently used to live in a hedge.
To access the engine bolts, the yellow chain case cover needed to be removed.
Note the BSA rubber bung proudly advertising the name of the manufacturer.  Bear in mind it would have been completely hidden by the engine enclosure almost all of the time!


 It looks fairly clean inside the chain case, quite unlike everything else.  Engine bolt is accessed just behind the top run of the chain but there is enough slack to not have to remove the chain:

With the two engine bolts removed, the engine lifted out easily, leaving the layshaft, drive chain and inner chain cover in place.  They drop down without the engine bolts to hold them in place:

The engine


Engine bolts were replaced to keep the chain case and layshaft in position.  The tall nut on the left hand side is apparently the belt drive adjuster but I haven't really worked out yet how it works - not helped by the distinct lack of belt, I suppose.
Behind the plastic flywheel cover.

Dead bodies

Plastic cover just needs a clean and it is ready to fit to Bertie Batavus.
The flywheel cover fits directly on to the Batavus engine.  There are supposed to be some sort of spring clips to hold them on but those were missing, of course.  That probably explains why the covers are missing on a lot of the other Batavus images I've found on 'tinternet. I'd been hoping there would be a cover for the clutch as well but I'd forgotten that the Ariel 3 has a fan fitted on that side that means there is nowhere for a clutch cover.  However, the flywheel cover also fits where the clutch cover should be so I need to check if there is one in with the original blue Ariel 3 so it can be loaned to Bertie and help keep him protected from the rain.

The idea is to get the Batavus all sorted and running properly and reliably (and road legal so I can use it on NACC runs), then use the running engine as a reference for when I try and put an Ariel 3 together.

Festival of 1000 Bikes

Piccies to follow